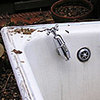
After a bathroom refurbishment at the end of 2003, we were left with an old bath. It wasn't a nice old freestanding bath, but more of a modern, square-edged design. The bathroom installers offered to smash it up and take it away. As it was made of steel or iron, this sounded like it would be a very noisy process, and also seemed like a waste. No one I knew wanted it. After some thought, I decided to reuse it as a large planting container.
Not an easily portable container
The guys from the bathroom company offered to lift it into the garden. It had to be carried down the stairs, around a sharp angle at the bottom of the stairs, and through the kitchen. It took three people to lift it, and there was much huffing and puffing.
It was left outside the back door, and I knew that wherever it was going next, it couldn't be too far from where it had been placed, as it was obviously too weighty and bulky to manouevre far. So it had to stay in Kitchen Corner.
Useful growing space
For some years I'd been wondering how best to change Kitchen Corner's planting against the boundary wall that divides us from the street. The forsythia shrubs (more trees, really) need constant pruning to stop them invading the pavement space on the other side. Ivy has been planted too, to grow up them and provide evergreen cover, as the forsythias are of course deciduous. On our side, the roots from the forsythia and ivies take all the moisture from the raised bed around them, where over the years I have managed to grow shade-loving plants. In the last year or two have noticed that only the strongest plants, and the ones that like drier soil, have hung on in there.
It seemed a good plan to dismantle most of this raised bed, and to put in its place the old bath. If this large planting container was then planted up with something that would grow up against the wall, it could get established without root competition, and in time replace the forsythias. They are only there to give privacy and protection. They rarely flower because they're being pruned several times a year and so don't get much chance to develop flowerbuds.
Tap removal and raised bed dismantling
Removing the old bath taps took a while, as I guess they'd been attached to the bath for many decades. Dismantling the raised bed where the bath was to go meant moving lots of soil into plastic sacks. Thankfully the weather was dry, though it was still a rather messy job, particularly when I had to drag the bath across the gravel of Kitchen Corner to get it into position.
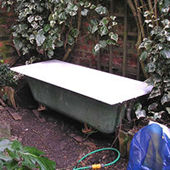
It might have been better to wait for assistance, and certainly I couldn't have carried it, but dragging it into position was possible, with several rests and tea breaks. It only had to move about two metres, but it still took about half an hour. Still, there was some satisfaction in getting it there, into position against the wall. Until I realised that it was the wrong way round and had to be turned around.
Drainage concerns
My main concern was that it wouldn't drain very well, as the only drainage hole is the old plug hole. I made sure then that the bath was angled slightly upwards at one end so that the plug hole end was lower, I covered the plug hole with wire mesh to deter any slugs, worms etc from getting into it and blocking it up, and then used a really thick layer of crocks and gravel right along the bottom of the bath. It was still on its original metal legs, so was raised a few inches from the ground.
Painting and filling
The white enamel that needed painting was sanded and undercoated, and later, when I got around to it, painted with proper gloss paint, in a neutral kind of green.
The planting mixture used to fill it had to include some garden soil, as I had so many bags of it, but it couldn't be used on its own. It was mixed with garden compost and large bags of New Horizon peat-free compost.
There are pictures of the various stages of this, and they won't fit easily on this page, so are available on a following page if anyone is interested - Any old iron - page 2
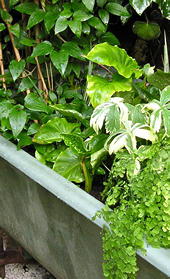
I was concerned about the drainage, so I didn't plant anything special or permanent in it until the following year, 2005. As it seems to have sustained some plants over the last year, I've now planted two clematis in it, at either end, and a few perennial plants in the centre.
Bathtime visions
I recently came across some particularly apt words from Stephen Lacey:
"I would be surprised to discover that I was the only person whose most exciting gardening moments are spent in the bath. Most keen gardeners are incurable romantics and every opportunity of drifting away into a world inhabited by stout Himalayan poppies, fat lewisias and giant marrows is greedily snatched. And where better for a prolonged and uninterrupted daydream than the bathroom?"
The old bath deserves a place in the garden, as baths tend to be where many gardeners have all their ideas. I'm sure it was while in the bath that I had the idea of demolishing half the garden shed. Compared to that, this bath remodelling project was easy.
It just remains to be seen whether this new container will drain adequately for plants to grow in it in the long term. If not, a plan B is possible - what better use for an old bath than to be used as a(nother) water feature? With this in mind, I've kept the plug.

Above: Old bath, now a large planting container.
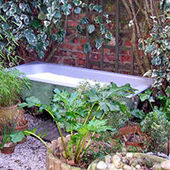
Above: The bath planted up, in May 2005
I want to see more photos of the old bath becoming a large plantpot!